
One of the best ways to change the look of a kitchen without spending a lot of money on a full renovation is to paint the cabinets. Many homeowners look for ways to paint kitchen cabinets because it can dramatically transform the appearance of the kitchen while staying within budget. Painting cabinets instead of replacing them gives them a fresh and stylish look while keeping the original cabinet structure.
To paint kitchen cabinets properly, several steps are required, including preparation, cleaning, sanding, priming, and painting. Each step is important to ensure the final finish looks smooth, durable, and professional. When done correctly, painted cabinets can last for many years and significantly improve the appearance of the kitchen.
This complete guide explains how to paint kitchen cabinets, including the tools you need, preparation methods, painting steps, and professional tips for achieving a flawless finish.
Why Painting Kitchen Cabinets Is a Good Idea
Many homeowners choose painting instead of replacing cabinets because it is more affordable and practical. Learning how to paint kitchen cabinets allows you to give your kitchen a high-end look without spending a large amount of money.
Some important reasons to paint kitchen cabinets include:
-
Affordable kitchen renovation
-
Complete visual transformation of the kitchen
-
Ability to customize cabinet colors
-
Extends the lifespan of existing cabinets
-
Environmentally friendly alternative to replacement
Another advantage is that painting works on many cabinet materials such as solid wood, MDF, laminate, and plywood.

Tools and Materials Needed to Paint Kitchen Cabinets
Before learning how to paint kitchen cabinets, it is important to gather the necessary tools and materials. Using the correct equipment ensures a smooth and durable finish.
| Tool or Material | Purpose |
|---|---|
| Screwdriver | Remove cabinet doors and hardware |
| Sandpaper | Smooth cabinet surfaces |
| Degreasing cleaner | Remove grease and kitchen residue |
| Painter’s tape | Protect surrounding areas |
| Primer | Helps paint adhere properly |
| Cabinet paint | Provides a durable finish |
| Paint roller | Covers flat surfaces evenly |
| Paint brush | Used for corners and details |
| Drop cloth | Protects floors from paint |
Having these tools ready makes the cabinet painting process easier and more efficient.
Choosing the Right Paint for Kitchen Cabinets
Selecting the right type of paint is a very important part of learning how to paint kitchen cabinets. Cabinets experience frequent use, moisture, grease, and cleaning, so the paint must be durable.
Oil-Based Paint
Oil-based paint provides a smooth and durable finish. It creates a hard surface that protects cabinets well.
However, oil-based paint has a strong odor and requires longer drying time.
Latex Paint
Latex paint is water-based and easy to use. Many homeowners prefer it because it dries faster and produces less odor.
Modern latex cabinet paints are also highly durable.
Alkyd Cabinet Paint
Alkyd paint combines the benefits of oil and latex paints. It offers strong durability while allowing easier cleanup.
Preparing Kitchen Cabinets for Painting
Preparation is the most important step when learning how to paint kitchen cabinets. Proper preparation ensures the paint adheres correctly and lasts longer.
Step 1: Remove Cabinet Doors and Hardware
Start by removing cabinet doors, drawers, hinges, and handles. Label each piece so that reassembling the cabinets later becomes easier.
Step 2: Clean All Surfaces
Kitchen cabinets often collect grease, oil, and dirt over time. Use a degreasing cleaner to thoroughly clean the surfaces before painting.
Proper cleaning ensures better paint adhesion.
Step 3: Sand the Cabinets
Light sanding removes the old finish and rough surfaces. This step allows primer and paint to adhere more effectively.
Use medium-grit sandpaper to smooth all cabinet surfaces.
Priming Kitchen Cabinets
Primer plays a crucial role in the cabinet painting process. Applying primer creates a base layer that helps paint adhere and prevents stains from bleeding through.
Benefits of Using Primer
-
Improves paint adhesion
-
Prevents stains from wood surfaces
-
Creates a smoother finish
-
Increases paint durability
Apply primer evenly using a brush or roller and allow it to dry completely before painting.
Step-by-Step Guide to Painting Kitchen Cabinets
After preparation and priming, you can begin painting the cabinets. Following these steps will help achieve a professional-looking finish.
Step 1: Apply the First Coat of Paint
Use a brush for corners and detailed areas, and use a roller for flat cabinet surfaces. Apply a thin and even coat of paint.
Thin coats help prevent drips and uneven texture.
Step 2: Allow the Paint to Dry
Drying time is important when learning how to paint kitchen cabinets. Allow the first coat to dry completely before applying another coat.
Drying time usually takes several hours depending on the paint type.
Step 3: Lightly Sand Between Coats
Light sanding between coats helps maintain a smooth surface and improves paint adhesion.
Step 4: Apply the Second Coat
The second coat deepens the color and increases durability. Most cabinets require two or three thin coats for the best results.
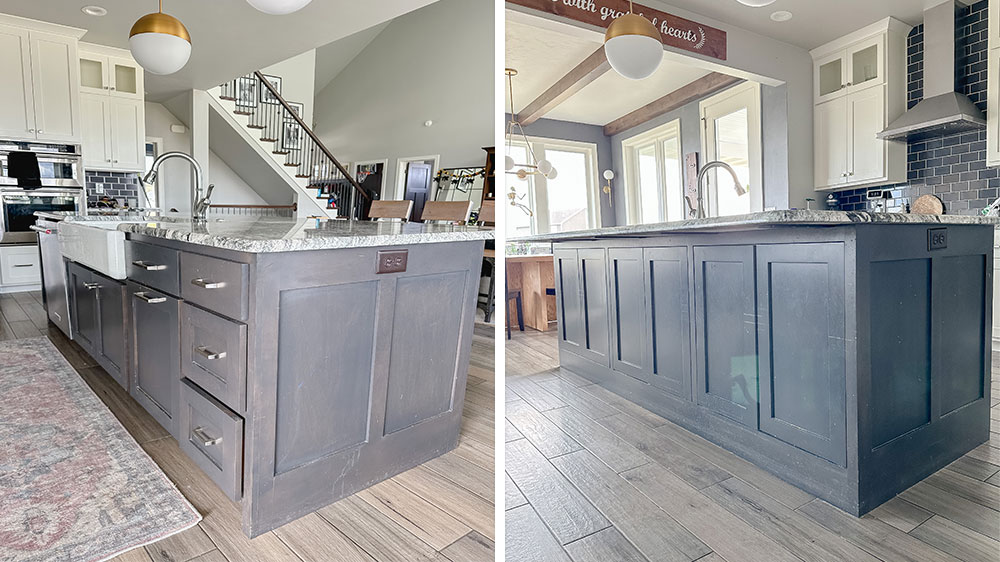
Best Colors for Painting Kitchen Cabinets
Choosing the right color is an exciting part of learning how to paint kitchen cabinets. The cabinet color can completely change the kitchen’s atmosphere.
Popular cabinet colors include:
-
White cabinets for a bright kitchen
-
Gray cabinets for a modern style
-
Blue cabinets for a bold appearance
-
Green cabinets for a natural look
-
Black cabinets for a luxurious design
Neutral colors are often preferred because they match many kitchen styles.
Common Mistakes to Avoid When Painting Cabinets
Although painting cabinets may seem simple, certain mistakes can ruin the final result.
Avoid these common errors:
-
Skipping the cleaning step
-
Not sanding cabinet surfaces
-
Applying thick coats of paint
-
Skipping primer
-
Rushing the drying process
Following the correct painting process helps ensure a smooth and long-lasting finish.
How Long Does It Take to Paint Kitchen Cabinets?
Many homeowners wonder how long it takes to paint kitchen cabinets.
A typical project timeline may look like this:
| Stage | Estimated Time |
|---|---|
| Removing hardware | 1–2 hours |
| Cleaning cabinets | 2 hours |
| Sanding surfaces | 3–4 hours |
| Priming and drying | 4–6 hours |
| Painting coats | 1–2 days |
| Reassembly | 2 hours |
Overall, painting kitchen cabinets typically takes 2–3 days, depending on the kitchen size.
Professional Tips for a Perfect Cabinet Finish
If you want your cabinets to look professionally painted, follow these expert tips.
Use High-Quality Paint
Low-quality paint may chip or fade quickly. High-quality cabinet paint ensures durability.
Apply Thin Coats
Thin layers reduce brush marks and create a smoother finish.
Allow Proper Drying Time
Patience is important during cabinet painting. Rushing the process can damage the finish.
Use Good Lighting
Proper lighting helps identify uneven areas while painting.
Maintaining Painted Kitchen Cabinets
After painting your cabinets, proper maintenance helps preserve the finish.
Maintenance Tips
-
Clean cabinets using mild soap and water
-
Avoid harsh cleaning chemicals
-
Wipe spills immediately
-
Tighten cabinet hardware occasionally
With proper care, painted cabinets can remain beautiful for many years.
Conclusion
Learning how to paint kitchen cabinets is one of the best DIY projects for improving a kitchen without spending a large amount of money. With the right tools, preparation, and painting techniques, anyone can achieve a beautiful and professional-looking result.
The key steps include removing hardware, cleaning surfaces, sanding, priming, and applying multiple thin coats of paint. Each step plays an important role in creating a smooth and durable cabinet finish.
Painting kitchen cabinets not only improves the appearance of the kitchen but can also increase the value of your home. With the guidance provided in this complete tutorial, you can confidently start your cabinet painting project and enjoy a modern, stylish, and welcoming kitchen.
Read more:-Green Kitchen Cabinets: Stylish Ideas, Benefits, and Design Tips